Shooting it: Dreaming of Something Nice

In this post I will be very short, because it’s a simple one light, shoot-through umbrella shot! And that was actually the time when I had my first touch to the lens I started loving later, the 135/2, that I was borrowing from my friend we were shooting together! I guess about 6 months after that I had already purchased it to not stop using it until today! The location is close to the famous waterfall in Kobe, Nunobiki-no-taki, and it’s a cold February day!
STROBIST INFO & GEAR:
As I already mentioned, it’s just one light here, and I am using a shoot-through umbrella, this is a setup that is very easy to use on different locations, and the thing I like most is that it’s portable and quick to setup! One of my next articles will be with only examples of one umbrella setup shots, it’s coming soon!
So I had the umbrella set up left side, diagonally from the model, and her face is turned to the center of it, to get some soft nice lighting! The stairs where we are shooting was a bit steep, so I had to use some bungee cords in order to bind the flash-stand with the umbrella to the fence there, otherwise there was no other way to get it standing! The flash I am using is 580EXII, on manual mode, I don’t really remember that power I had it set up to, but most probably it’s been at about 1/8th – 1/16th!
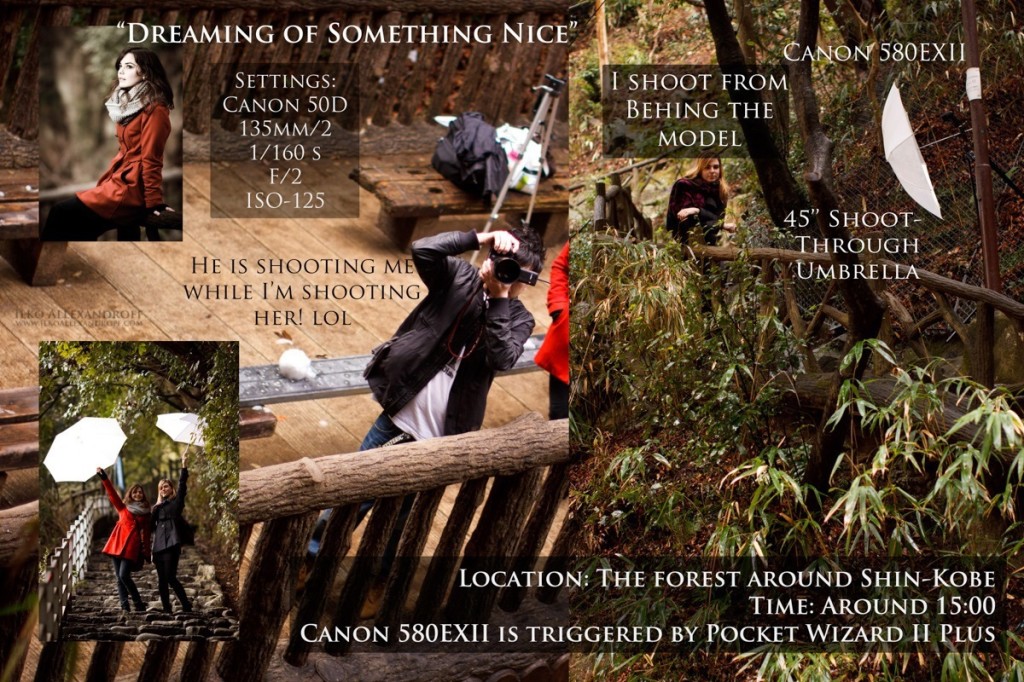
Finally the technical details about the gear used. The flash is triggered by Pocket Wizard II Plus, and at that time I am still using Canon 50D for the session, a few months after that I already purchased the 5DM2, but this shot is from the time I was using crop sensor camera! And the lens I’m using is Canon EF 135mm f/2.0 L USM, which is maybe the one I’m using most often! I love it for the way it compress the background, and the beautiful bokeh it creates! I will write an article only for that lens and my experience with it soon, but until then you can see some of the works I have with 135/F2 in my Flickr album dedicated to the lens – CLICK HERE!
Final Result

Here is the final image that I liked most from that shoot, I haven’t done any retouch and editing, all I changed in post is the toning of the colors, and some basic settings while I was editing the RAW file! I also wanted to kill a little bit the red color of her jacket which was quite strong, and was maybe a little bit too distracting.
In the end…
And now, I am preparing a series of new articles on some general topics, let me know which one of them you want to see first, so I get it ready earlier! Also other ideas are welcome too! Here are some of them:
Portraits at night / Lens article (I guess 135/2) / Portraits in the rain / Use of gels / Using backlight / One light setups / Shoots with just one umbrella / General shooting portraits / Can cheap lenses make good photos / Swing the camera shots / Using snoots / Shaped bokeh / … or any other idea welcome, post it in the comments, and I will see if I am able to write about it!
Of course I have lots of other shots, I will be writing, so I hope I can do it at least 2 times per week, so when you have time check it out again!
Feel free to check my Facebook Page: Ilko Allexandroff Photography, and also my new project, called Perfect Portrait here:
ライティング解説の記事は基本的に英語で書いてるけど、今からは一言日本語でも書きます!この撮影ではアンブレラーひとつでやってます!一番簡単で、使いやすいライティングはそれだと思います。ストロボはキャノン580EXII で、強さは正確に覚えてないけど、確か、1/8 – 1/16のパワーだったと思います!
もしもっと日本語で記事がほしい人がいれば、ぜひコメントかメッセージを入れてください!時間があるときに作るかもしれないです!


Trackbacks & Pingbacks
[…] But not always using light should be dramatic. Sometimes you can use it to deliver a subtle effect or to better direct your audience. Shallow depth of field and one shoot through umbrella was all it took to create this gorgeous portrait… […]
Leave a Reply
Want to join the discussion?Feel free to contribute!