Post Views: 4,782
Here is another photoshoot of the model I’ve been shooting most by now Asuka! I can’t even count how many times we’ve been shooting together! So this time we took some photos I guess nobody usually takes in a Japanese Temple, hehe, I guess not many people would go with this fashion there! That day we’ve been shooting outside and inside, but in this article I will talk about the lighting I’ve been using for the inside shot! Asuka is also very creative, so in some cases I don’t even know the outfit we are gonna shoot with, and this was the case here! We quickly decided to do the shoot, the time and location, not any planning! And here is a small advise if you decide to shoot in temples like this, ask your model to take her shoes off, you’ll see why in the “Location” paragraph! 😉
Location – Joonji Temple (長遠寺)
Strobist info:
Canon 580EXII with a shoot-through umbrella, camera left-up Triggered by Pocket Wizard II Plus3x Bare flashes behind her to change a bit the color of the background: Sunpak AF5000 with 1/2 CTO, Nikon SB-26 with 1/2 CTO, Sigma EF-430 also with a 1/2 CTO filter
The main Canon 580EXII is triggered by Pocket wizard, and all the other flashes are triggered by Optical Slave from the Canon flash unit
Location
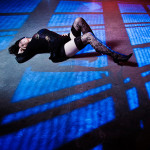
As I already said, we have been shooting in a temple in Amagasaki, called Joonji. It’s a nice quiet place, without crowd of people all the time, so nobody disturbed us while we were taking photos (or maybe I should say we didn’t disturb anyone lol) The only little problem we actually faced was from the staff in the temple, who after 15 minutes shooting inside came, and I was pretty sure he would tell us to leave, but he was so kind to just tell us, actually her to take here shoes off… so that’s why you see them there on the main shot! 😉
Lighting
 I took this shot at the time when I was mainly using shoot-through umbrella as my main light, so here it is too! I think it was the right tool to lit my model in this case, so next I had to decide what to do with my background, should I leave it like it was, or play a bit more with it! I tryed to leave it unlit, but it looked too natural, maybe I wanted something more in this case, so I decided to put a few flashes with CTO gels behind her! I didn’t use only one, although it was not so big space, but I wanted to lit the passage evenly, so I put three flashes behind her, at basically the same distance from each other to get nice exposure of the background! Also you can see in the setup shot, that I’m using 4 flashes from 4 different brands in this shot, Canon, Nikon, Sunpak and Sigma! They all have different guide number, so it took me some time to get used to the power I need to use when I mix them, but at that time these were the best cheap apternatives to use! And, of cource it took me a few test shots to fix the exposure, and then we were ready to shoot!
Gear
At that day we have been shooting both, inside and outside, and the inside place we used was a pretty small passage, and I was still using my old Canon 50D for this shoot, so I needed to go with wide angle and use my Sigma 17-70/2.8-4.5 lens. That was my main zoom lens when I was still using crop sensor camera, you can see an album with other photos of that combination here: CLICK! I am triggering the main Canon flash in the shoot-through umbrella by Pocket Wizard II Plus, and all the other flashes are triggered by the impulse of it, with Optical slave. That was not difficult to accomplish in this case, as they were easily seeing each other to be fired all!
Model: Asuka Nakagawa / 中川飛鳥
美容師、ヘアメイク、アクセサリーデザイン…美を創造することを愛しています。
作品全てが飛鳥のセルフプロデュースによる写真になっています。
She is doing hair & make-up, accessories design, and other things! Asuka is producing all the accessories for the photographs we take together!
So in the end I would like to mention one more time about our new project called Creative Lightbrary! We started it recently with my friend Ognyan Dimitrov, and we are going to post everything connected to digital photography where we will cover our experience with different light modifiers, DIY stuff, lighting diagrams, post production, useful software and many other tips. Our main goal is not to teach but to give everything that is useful for your journey in the world of digital photography. Click on the logo to check it out! Also follow our Facebook page connected with the project to subscribe for future updates, and we have prepared already many things to post soon! Here is the link to the page: Creative Lightbrary on Facebook
Comments
comments


Leave a Reply
Want to join the discussion?Feel free to contribute!