Shooting it: Haunted Tunnel (Light Blaster)
Intro
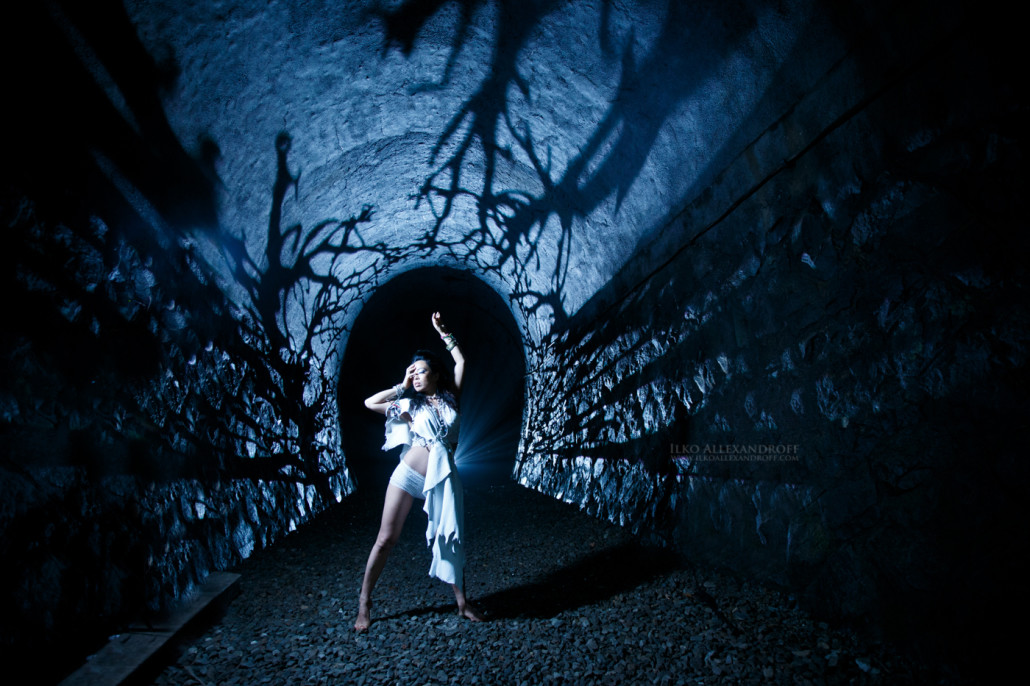
I’ve really been having lots of fun with the Light Blaster recently! Here is another series of photos taken using it for background modifier! Last month I had some really big strobist seminars in Tokyo and so many people have been asking me about the gear I will be talking in this article! The Light Blaster – a pretty cool modifier which can project images on the background! This shoot was a very recent one, I know usually I take quite long to upload my articles, I promise to be quicker from now!
最近ライトブラスターで撮影するのがとても楽しいです!この前のフォトネクストでのストロビストセミナーで使った機材を紹介します!特にそのときに背景作りで使ってた「ブラスター」の取り合わせがたくさんあったのでご紹介します!それを使うとプロジェクターみないに、ストロボを使って背景を作ります!詳しくは機材&ライティングの説明見てくださいね!英語の説明のしたには日本語の説明も入れます!
Gear
This photoshoot is also taken with my new Canon 1Dx Camera! I’ve been shooting almost 3 years with Canon 5D Mark II, and finally I’m changing to the highest class body! One of the main reasons is that quite often I’m shooting in locations with tough conditions an I want to have a tough body that I shouldn’t worry about when I shoot in a hard rain, or something else happens! And my lens for the shoot is Canon 17-40mm F/4, I rarely use zoom lenses but here I had a reason, I needed wide angle lenses on both, camera and light blaster!
Nissin MG8000 are the 2 strobes I am using for the shoot, awesome when I need full power to overpower the daylight and if I need to shoot quickly without caring for overheating the strobes! I’m also having Nissin Power Pack PS8 on the strobes!
My triggers are Cactus V6, recently I switched to them from Pocket Wizard, and that was a great decision to make! Using them I can control the flash power of my manual flashes without the need to go and even touch them!
Light Blaster – ok, this is a new tool that I’m writing for the first time! Jump to the lighting section below for more info about it! Basically using it I can design a boring background into something interesting, and much more!
And another lens Canon 24mm F/1.4 attached to the light blaster!
FlashBenderXL Pro is the small strip box I’m using as main light! It’s a relatively small light source but it is making really nice light, and is vary handy to have it on location, because it takes almost no time to fold it, and get it ready to use!
機材
まず、カメラはこれから Canon 1Dx Cameraです!3年近く使ってたマーク2はしばらく休みです!なぜ1DXに変えたかというと、一番メインの理由はかなりめちゃくちゃなロケで撮影することが最近多いからです!最近の土砂降りで5D がほぼ使えなくなりました!レンズは Canon 17-40mm F/4, です!ズームレンズ使うのが少ないけど、この撮影ではブラスターもカメラも広角レンズが必要だったのでカメラに付けました!
ストロボはNissin MG8000 です!マシンガンストロボはパワーが必要なときにとても大事です!ストロボも結構フル発光で使うことが多いので、純正のストロボだったらオーバーヒートして、しばらく使えなくなることがあります!MG8000は一切暑くなることがないので、撮影に集中できます!バッテリーパック Nissin Power Pack PS8 も使ってます!
ラジオスレーブはCactus V6です!
Light Blaster を使うとつまらない背景でも、面白くすることができます!ブラスターはプロジェクターみたいですが、ライトはストロボになります!ロケでも使えますよ!
レンズもう一本、Canon 24mm F/1.4 このレンズはブラスターについています!メインの理由、明るいです!
FlashBenderXL Pro はメインライトについてる小さいソフトボックスです!コンパクトで、光は比較的に硬いですけど、使い方によってただストロボだけ使うよりはすごくいい光を作っています!
Lighting
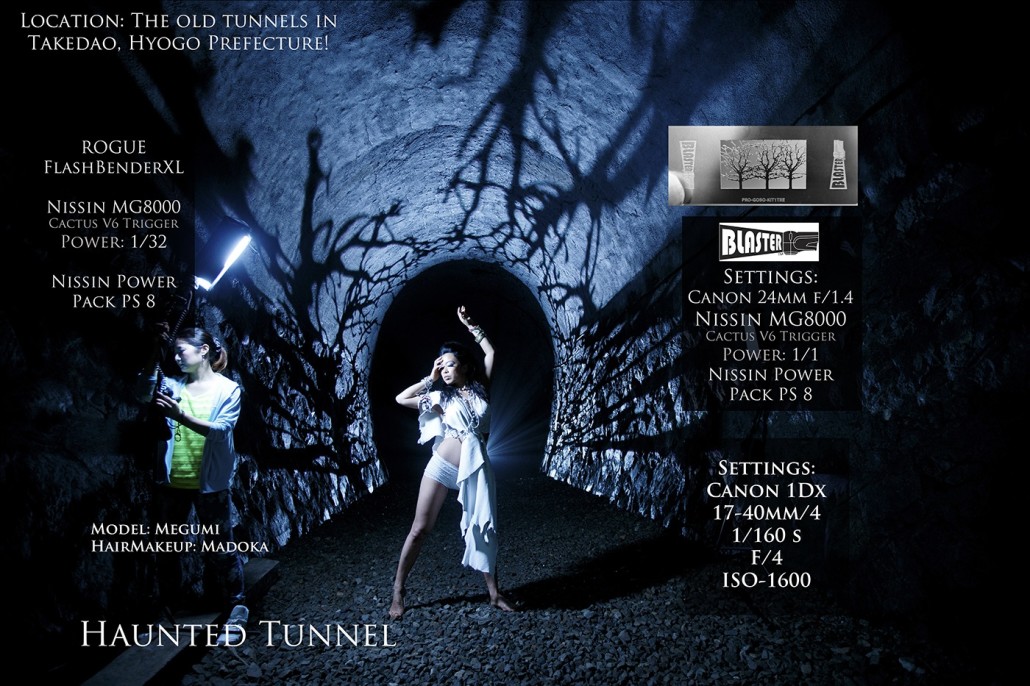
For my main light I’m using a FlashBender XL Pro, since I wanted a little hard light, and also I didn’t want it to go everywhere like it would if I used a shoot-through umbrella! Recently this is a very important part of my gear on almost every location shoot! It is a small and compact strip box. It makes relatively hard light, but depending on how you set it it is still softer than going with just a strobe, and it makes some really nice light! I quite often use it as a main light for my model, but also I like using it as rim light from behind to add shape to my subject! Generally I tend using it mostly when I don’t need so soft light, and I want to make my images look a little cool! I’m shooting at the entrance of the tunnel! My lens is 17-40mm, and I’m at 17mm here! My aperture is also the fastest possible, F/4! I have a Nissin Power Pack PS8 on the MG8000 strobe, but since I was not shooting at very high power even without it it would be fine! My ISO is really high here, it is 1600, happy I am with my new Canon 1DX Camera, it can really hold it good!
ライティング
この撮影でメインライトとしてはRODUEのFlashBenderXL Proを使っています!最近ロケでよく使ってるモディファイヤーです!この場合にライトをモデルさんに集中させたかったので、アンブレラーだったら要らないところに広げます!それで、ベンダーを使っていました!コンパクトで、かっこいい光と作っています!使用レンズはキャノンの17-40mm F/4です!広角17mmで撮影しています、そして絞りも開放、F/4です!ストロボはニッシンMG8000マシンガンストロボです!バッテリーパックを使うと、もっと早く電池がリチャージできますが、この場合は感度1600で撮影しているので、パワーが1/32ぐらいだったと思います!高感度で撮影する理由が後ろの背景を作る、ライトブラスターにもっとパワーがほしかったからです!背景の模様はしたの写真に写ってる「ライト・ブラスター」で撮っています!
Light Blaster
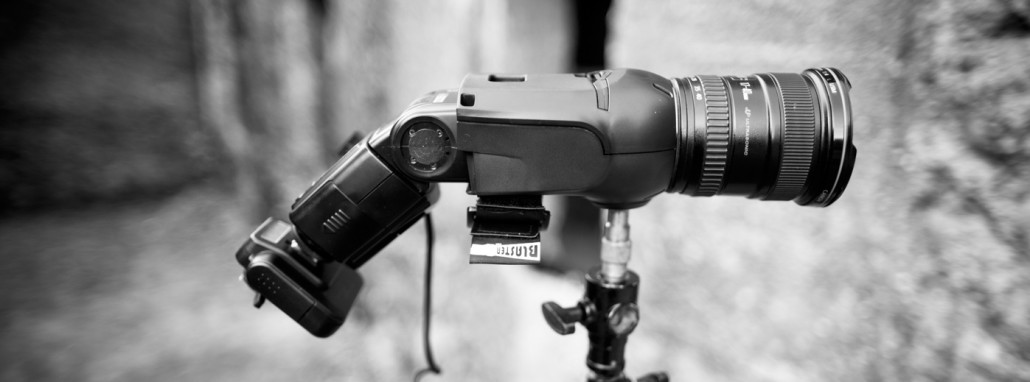
Basically you need a strobe and a lens and it turns into a projector. But unlike a normal projector it is using the strobe power so it is quite powerful! The strobe is tightly fixed on the back side of the Light Blaster, and the lens is mounted on the front side! If you use Canon lenses you can mount them the way they are, and for Nikon lenses you might need some adapter! You don’t really need that quality lens for the projector part, but I would suggest you to use as bright lens as you can! I personally prefer something like aperture f/1.4, which compared to the lens on this image for example (Canon 17-40 F/4) is giving you the advantage of 3 stops of light! So how about the backgrounds? The slide I’m using for the top photo of this post, it is a part of their Pro Gobo Kit set, that has many interesting patterns!
There are a lot of slides that you can purchase together with the Light Blaster, and some of them are really cool! Of course you can get creative and create your own slides! Also you can use the 35mm film slides of you have any!
So, the choice of lens Canon 24mm F/1.4 vs. Canon 17-40mm F/4, which one should I put on the camera body, and which one on the Light Blaster? This could be tricky, and you need to think about it carefully! Let me start from the back, to make it easy to understand, I needed ISO-1600 here to expose properly the tunnel with having the Nissin MG8000 strobe at full power 1/1, and the Canon 24 F/1.4 lens set on it! Then on the camera body I had the F/4 lens. Could I do it the other way? Sure, i could set the F/4 lens on the Blaster, and lose 3 stops overall on the background light, and get them back using the F/1.4 lens on the camera body, which would let around 3 stops of available light (if there is any) to influence your photo! Well, it is your choice which one you should do, but generally I would prefer using the brighter lens on the Blaster!
So for the strobe at the blaster I do have also a battery pack, and for it was really good to have it since it was at 1/1 power and I wanted it to charge quickly! Well to be honest in most cases when I’m using the blaster from the beginning I set my strobe at Full power and usually I adjust everything else after that! I trigger both flashes with Cactus V6 Trigger as I said already! In a separate article soon I will write more about the blaster with some more of my examples created using it!
ライト・ブラスター
ライト・ブラスターはかなり面白い機材ですよ!それを使えば、あんまり面白くない背景でもプロジェクター使ってるみたいに、自分の好きな背景作れます!この写真もライトブラスターで背景をいじっています!上記の写真にブラスター自体が写っています!ストロボとレンズをつけて、そしてもともとついてるスライドなどを使うと背景を何でも変えれます!手で持ってるのがこの撮影のメインのフォトに使ったスライドです!日本にもライト・ブラスターを取り扱ってるお店がひとつあるので、ぜひご確認ください: OMNIVAS | 機材屋オムニバス ← 名前を押していただいたら、ブラスターのページに飛びますね!
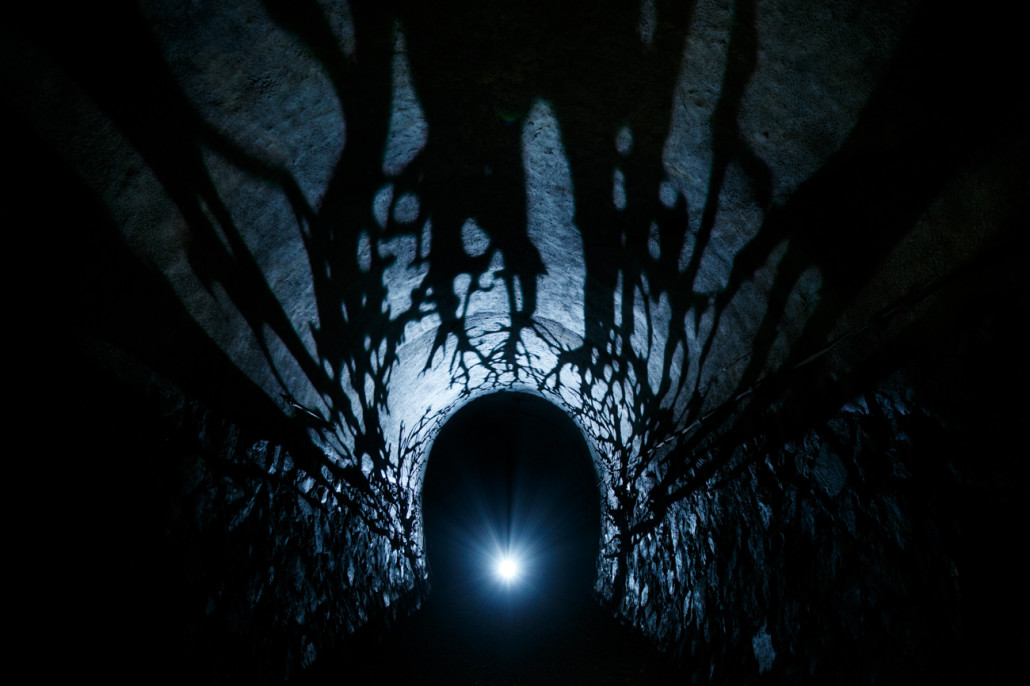
ブラスターを使うときはキャノンのレンズが必要になります、ブラスターはキャノンマウントなのです!レンズが明るいほど、光が強くなるので、短焦点レンズがお勧めですね!私の場合24mmの1.4レンズをよくつけます!そして、だいたい使うときはストロボはフル発光のときが多いです!この撮影では写ってる通りに、ブラスターはカメラのほうに向いています、それでトンネルの壁がブラスターの模様になりますね!このトンネルがかなり大きいので、ストロボ1灯だけで全部光らせるのが難しかったので、感度はISO-1600です!ストロボは1/1パワーに設定してるので、バッテリーパックも使っています!
Final Results
This was the first time I’m showing you photos with the Light Blaster as a background modifier, and to be honest it really kind of motivated me to shoot more indoors and even in some boring studios! For this shoot I was having my friends For this shot model is Megumi Yuzuki, and hair make up is by Madoka! Here are couple of shots from this photoshoot! And I’m quite excited now to try to make some new interesting backgrounds for my next works!


In the end
Now, I am preparing a series of new articles on some general topics, let me know which one of them you want to see first, so I get it ready earlier! Also other ideas are welcome too! Here are some of them: Portraits at night / Lens article (I guess 135/2) / Portraits in the rain / Use of gels / Using backlight / One light setups / Shoots with just one umbrella / General shooting portraits / Can cheap lenses make good photos / Swing the camera shots / Using snoots / Shaped bokeh / … or any other idea welcome, post it in the comments, and I will see if I am able to write about it! Also stay tuned for my new blog section starting soon called “Strobist Diary” There I will talk about many of my off-camera flash techniques from basic things to some advanced stuff!


Trackbacks & Pingbacks
[…] 照片的重点之一是那个阴森的背景,是使用Light Blaster打出来的,是一个以闪灯为基础的投影工具,照片详情按此。 […]
[…] Hard light creates drama and hard light coming from the back created even more drama. The interesting “texture” if the light is generated with a Light Blaster fitted with a blue gelled strobe… […]
[…] Hard light creates drama and hard light coming from the back created even more drama. The interesting “texture” if the light is generated with a Light Blaster fitted with a blue gelled strobe… […]
Leave a Reply
Want to join the discussion?Feel free to contribute!