Shooting it: Stroboscopic manual shoot
Intro
Shooting with stroboscopic photos can be quite easy if your strobes actually have Multi mode, but what if they do not support it, and they are just some manual flashes? This is what I will write in this post, it is a dance stroboscopic shoot, and for it I use only manual way to fire my flashes! And something more, for this stroboscopic shot I will be mixing ambient light and strobe light, to create some cool motion effect in it, could say it’s all DIY, using what I had around me! You can see another stroboscopic shot with the Multi mode clicking HERE! マルチモードあるストロボ使って、マルチ発光撮影するのが簡単ですか、もしそんなストロボ持ってなかったら撮れるのか?この記事では完全にマニュアルでマルチの撮り方を見せます!そして、もっと動きが入るように自然光もストロボと混ぜて撮っています!マルチモードと使った写真の解説もこちらで見れます: クリック!
Gear
Camera is Canon 5D Mark II nothing much to say about it! The lens is Canon 135mm F/2 USM
Strobes – I’m mixing Canon & Nikon strobes for this shoot, main reason – that’s what I had at that time! For some time I’ve been using the Canon 580EXII Strobe as a main one, and a bunch of Nikon SB-26s as secondary units!
Modifiers – I wanted a narrow long light so I used a set of stripboxes to lit her from both sides! One is 90×20 cm, and the other is originally not a strip box (80×60 softbox), but I narrow it so it turns to one!
Triggers – at that time I was using Pocket Wizard II Plus triggers
機材
カメラは Canon 5D Mark II です!レンズはCanon 135mm F/2 USM です
ストロボはキャノン&ニコン混ぜてます!なぜかというと、そのときはそれしか回りになかったからです!混ぜても問題ないですよ!機種は Canon 580EXIIと Nikon SB-26ですマルチモード使ってないです!
アクセサリーはストリップボックス2つで90×20 cm, のストリップと (80×60 softbox), ちょっと工夫したらストリップボックスになりました!
ラジオスレーブは Pocket Wizard II Plus です!
Location
I chose this location for the shoot because I had the dark background I needed for it, and I had enough distance between me and the model so I compress the background and use my 135 F/2 lens for it! It is a little hard to find in Japan studios that are long enough for this type of photos! Also there was some ambient light, but I will explain that more in the lighting section below! The place is in Hyogo prefecture and it is called Takedao, there are some old railway tunnels there!
撮影場所は兵庫県の武田尾です!トンネルの入り口の光がちょうどよかったので、こんな撮影では最高です!ただ下の石がちょっと動きにくいです!武田尾はしょっちゅう撮影で使ってるので、近いうちに武田尾アルバムアップしますよ!
Lighting
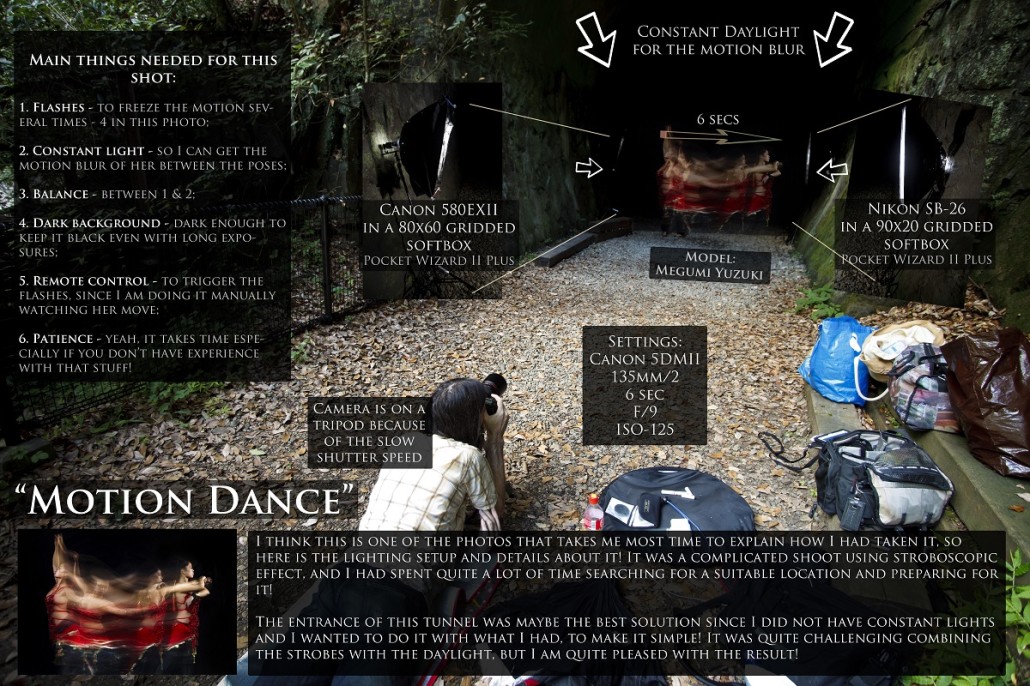
Main things needed for this shot:
- Flashes – to freeze the motion several times – 4 in this photo;
- Constant light – so I can get the motion blur of her between the poses;
- Balance – between 1 & 2;
- Dark background – dark enough to keep it black even with long exposures;
- Remote trigger – to trigger the flashes, since I am doing it manually watching her move;
- Patience – yeah, it takes time especially if you don’t have experience with that stuff!
First, let me talk about the strobe lighting part in the photograph! I am using 2 stripboxes from each side and they were set at approximately the same power, although the strobes are actually different! One was Canon 580EXII and the other one was Nikon SB-26, these were the first strobes I had used for long time! To be honest the Canon strobe has Stroboscopic mode, but for this shoot I wanted to to everything manual! So the strobes fire 4 times each, with each of them freezing the dancer in her position because of the flash impulse! The strobes were set at between 1/4 – 1/2 power, I don’t remember exactly, but for these strobes that the time they would need to recharge when firing a few times in a raw! The 4 flashes occur in about 6 seconds!
Second – the available light is what adds the motion blur to the dance movement! She is just inside the tunnel so some nice light would fall from about 45 angle degree to create that beautiful movement! The 6 seconds moving from left to the right create the lines! Also her shining red costume was making really cool effect! It would probably be interesting if she wore some white costume as well!
Balancing the strobe light and ambient light is the tricky thing in this shoot, basically I have control over the strobes but not over the daylight, so I balance the strobes to match the natural light! Of course If i wanted I could make her pose a bit more inside and with this decrease the ambient light! My camera is at F/9 for this shot which was enough for the strobes at that power to take her into the frame!
6 seconds exposure at F/9 and ISO-125 was enough in this case to make the tunnel almost black, and actually I could still make exposure longer if I wanted! That tunnel was so long and the other side is not even visible so it is a cool location to shoot dark photos!
How I trigger the flashes? Actually in this shoot I am not behind the camera! Here is what I do – Camera is on self times, I am right next to her, holding the Pocket Wizard in my hand, and clicking it every time I think I should “freeze” her movement! Yeah, I just watch her, and click the fire button!
ライティング
この写真の大事なポイント:
- ストロボ – ストロボの発光によって被写体がセンサーに写ります!この写真では4回光るので、4回写ります;
- 定常光 – 定常光では動きの流れが綺麗に写ります;
- ストロボと定常光のバランス;
- 暗い背景 – ロングシャッターのときでも真っ暗に写る背景;
- ラジオスレーブ – 指で好きな瞬間にストロボを光らせるスレーブ;
まずはストロボライティング の解説から始まります!! 先ほど言ったとおりにライティングはストリップボックスを両サイドから使っています! 左側はCanon 580EXII 右側は Nikon SB-26, だいたい同じパワーで背呈しています!キャノンのストロボはマルチモード実はついてるけど、ついてないストロボでも使えるのを見せたいので、使ってないです!それで、ストロボが4回光るとダンサーが4回写真に写ります!ストロボのパワーが 1/4 – 1/2 ぐらいでした!そのパワーで十分リチャージできてました!シャッタースピードは6秒です!
次は定常光です! 定常光では写真にダンサーの動きが写ります!もしそれがなかったら彼女が4回くっきり写る写真になってたけど、使ったらその動きもセンサーに入ります!ダンサーさんがちょうどトンネルの入り口にいます、それで定常光が綺麗に45度ぐらいから入りました!それでこのぴかぴか光ってる衣装が流れてるように映ります!
ストロボと定常光のバランス は一番難しいかもしれないです!ストロボのパワーはそのまま変えれますが、太陽のパワーは変えれないですね!その場合にできることはモデルさんをトンネルのもっと中に入れるか、入り口に近づけるかですね、それでだいぶ光が変わります!カメラはF/9で設定しています!
シャッタースピード6秒、感度125、F/9で トンネルが真っ暗です, 実はトンネルの中が暗かったので、もっとシャッタースピード長くできたと思います!
ストロボどうやって光らせるか? 今回はラジオスレーブはカメラにはついていないです!手で持っています!カメラ葉三脚において、セルフタイマーで撮ります!そして、私がダンサーの横にいて、いい瞬間でラジオスレーブのテストボタンを押すと、ストロボが光ります!それでマニュアルなマルチ発光の撮影ができますよ!
Final Result
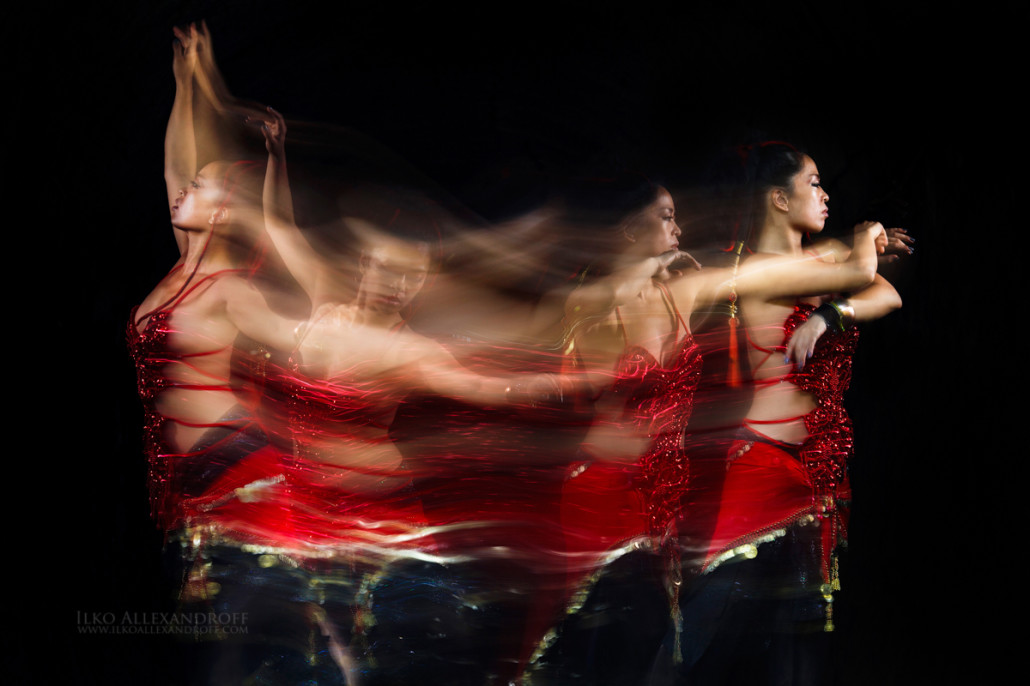
So as I said, you don’t need Multi Mode on your strobes to be able to do Stroboscopic photographs! All you need is a trigger to be able to fire your strobes remotely! Of course the big trade off is that you can’t be that precise with the timing, but for shots like this I don’t really need to be! My model for this shoot is Megumi Yuzuki, she is a dancer in Kobe, and was patient enough to let me fool around while I was asking her to do it again and again! lol So here is the final shot I liked most from this session!

In the end
Now, I am preparing a series of new articles on some general topics, let me know which one of them you want to see first, so I get it ready earlier! Also other ideas are welcome too! Here are some of them: Portraits at night / Lens article (I guess 135/2) / Portraits in the rain / Use of gels / Using backlight / One light setups / Shoots with just one umbrella / General shooting portraits / Can cheap lenses make good photos / Swing the camera shots / Using snoots / Shaped bokeh / … or any other idea welcome, post it in the comments, and I will see if I am able to write about it! Also stay tuned for my new blog section starting soon called “Strobist Diary” There I will talk about many of my off-camera flash techniques from basic things to some advanced stuff!


Trackbacks & Pingbacks
[…] 这是一幅慢快门作品,实行起来相当复杂,因为摄影师需要足够远的距离来拍摄,但一般日本影楼都没有这个长度,二来他需要足够稳定光源 (即是足够暗),所以就选取了这个隧道,更详尽的解说可按此浏览。 […]
Leave a Reply
Want to join the discussion?Feel free to contribute!