Shooting it: Using Light Blaster for Flower & Body Art Shoot
Intro
This time I will be uploading a series of 3 different articles, well actually all of them were taken at the same day, using the Nissin Japan company studio, and they were kind enough to even video tape the whole shoot, so I will be embedding their video in the article! This is the last set from that day, I will be using the Light Blaster to create my backgrounds here! この撮影だけでは3つ記事のシリーズをアップします!今回はスタジオ内で、東京のニッシン・ジャパンのセルフスタジオを使いました!そして、メイキング映像も撮っていただいてるので、記事にそれもアップしますよ!また、この最初のセットは上から撮影してるセッティングです!フラワーアーティスト&ボディメイクアーティストもいるので、みんなの紹介は下にありますよ!
Staff
Model: Yuzuki Aizawa / 相沢 優月 – Facebook
Flower: Maki Tsuchiya / 土屋 真紀 – Homepage / Facebook
Body Paint: Chie Matsuura / 松浦 千恵 – Homepage / Facebook
Photo: Ilko Allexandroff / イルコ・光の魔術師 – Homepage / Facebook
Thanks to: Nissin Japan / ニッシン・ジャパン – Homepage / Facebook
BTS Video
[youtube id=”A6DtT0wViBY” align=”center” mode=”normal” autoplay=”no” maxwidth=”1000″]
All 3 Articles
Shooting it: Using Light Blaster for Flower & Body Art Shoot
Shooting it: Color Shift in WB (Body & Flower Art)
Shooting it: Body Paint & Flower Art shoot
Gear
Camera for this shot is Canon 1Dx! And the lens I’m using is Canon 135mm F/2!
My strobes are 3x Nissin MG8000 and for the past few months I’ve been a hard Nissin user, since the MG8000 never overheats during photoshoot, no matter how much I shoot at high power settings, and believe me I do it a lot!
My triggers are Cactus V6, recently I switched to them from Pocket Wizard, and that was a great decision to make! Using them I can control the flash power of my manual flashes without the need to go and even touch them!
RoundFlash – RingLight & SoftBox is a really cool modifier, I’ve been using as a main light quite a lot for my recent photoshoots! It’s very handy easy to setup, and has really beautiful light especially for closeups! I also use it just as a softbox when I’m outside!
FlashBenderXL Pro is the small strip box I’m using as main light! It’s a relatively small light source but it is making really nice light, and is vary handy to have it on location, because it takes almost no time to fold it, and get it ready to use! I often use it as rim light!
Light Blaster – ok, this is a cool lighting gadget! Jump to the lighting section below for more info about it! Basically using it I can design a boring background into something interesting, and much more! And another lens Canon 24mm F/1.4 attached to the light blaster!
機材
カメラは Canon 1Dx です!このセットで使ってたレンズは Canon 135mm F/2, です!
ストロボはNissin MG8000 です!マシンガンストロボはパワーが必要なときにとても大事です!ストロボも結構フル発光で使うことが多いので、純正のストロボだったらオーバーヒートして、しばらく使えなくなることがあります!MG8000は一切暑くなることがないので、撮影に集中できます!
ラジオスレーブはCactus V6です!たった一つのどんなストロボでも、カメラについてるラジオスレーブで、すべてのストロボのパワーを調整できるトリガーです!もうすぐ日本でも発売します!
RoundFlash – RingLight & SoftBox はソフトボックスとして使うことがよくあります!非常に撤収が早くで、運びやすいので、ロケでは不可欠です!そして、光が綺麗で、特にヘアメイク作品などではよく使っています!
FlashBenderXL Pro はメインライトについてる小さいソフトボックスです!コンパクトで、光は比較的に硬いですけど、使い方によってただストロボだけ使うよりはすごくいい光を作っています!
Light Blaster を使うとつまらない背景でも、面白くすることができます!ブラスターはプロジェクターみたいですが、ライトはストロボになります!ロケでも使えますよ! レンズもう一本、Canon 24mm F/1.4 このレンズはブラスターについています!メインの理由、明るいです!
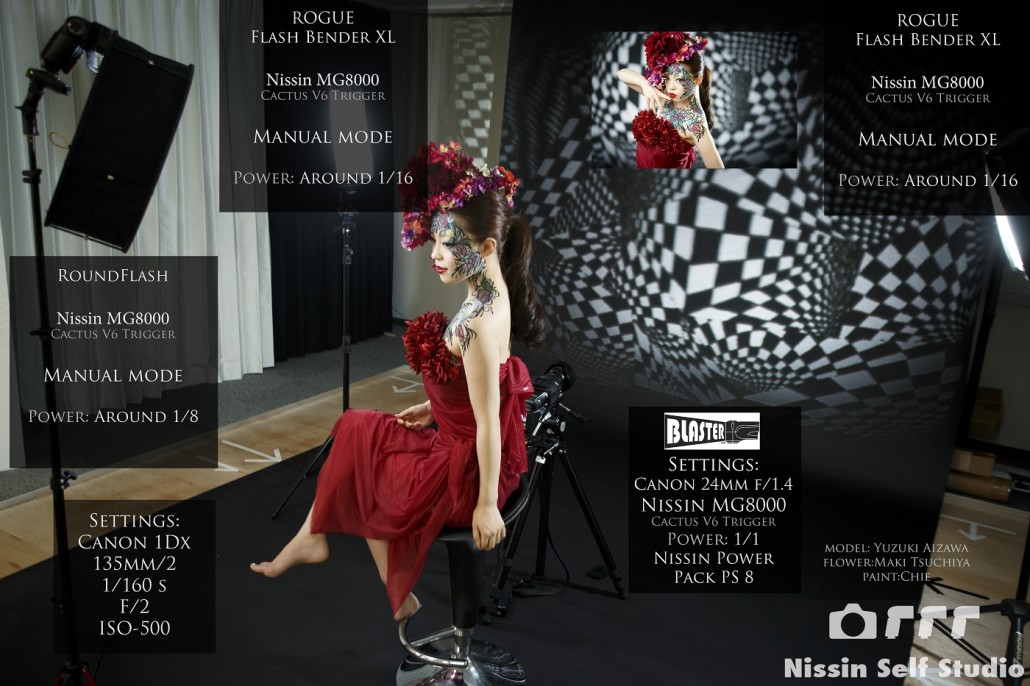
Lighting
For this shot I am using 4 light setup, and all the strobes are Nissin MG8000! I’m using some quite typical for me setup with main light being the RoundFlash Softbox, 2 rim lights from each side for which I’m having a couple of FlashBender XL Size strip boxes and a Light Blaster for the background! On the FlashBender rim lights! For the background I’m using a flash at low power with a Brown filter to match the mood a little! My lens is 135mm F/2 Prime lens, and I’m shooting at wide open F/2 aperture almost all the time! Since I am using 4 strobes I have them all on separate groups on my radio trigger Cactus V6, probably the best solution for off-camera flashes, since you can control your strobes directly from the camera unit! So I have my main light on Group A, the rim lights are on B and C, and my background light is on Group D! As I said, they are all controlled independently from the camera unit of V6!
ライティング
この撮影ではストロボ4灯使っています!全部Nissin MG8000マシンガンストロボです!背景は「ライト・ブラスター」で作ります!私がよくライティングは私のよく使ってるパターンで、メインライト1灯、リムライト2灯、背景のライト1灯です!アクセサリーはメインライトとして、RoundFlashソフトボックスひとつです!または、リムライトはFlashBender XLサイズ2つで、斜め後ろ両サイドにあります!両方のアクセサリーのURLは上の機材紹介で見てください!だいたい設定順番で言うと、まずはメインライトおをちゃんと設定してから、そのあとリムライトを調整します。最後に背景を設定しますね!最初のセットではRound Flashにはなんの色も入ってないです。後ろのライトはアクセサリーなしで、茶色のフィルターを使っています!使用レンズはCanonの135mmのF/2で、開放で撮影しています!ラジオスレーブはカクタスのV6です!それを使うとストロボはグループに分けて、それぞれカメラから調節することができるので、便利です!それで、この撮影でもストロボはそれぞれ別のグループに設定して、ひとつずつカメラからコントロールしています!
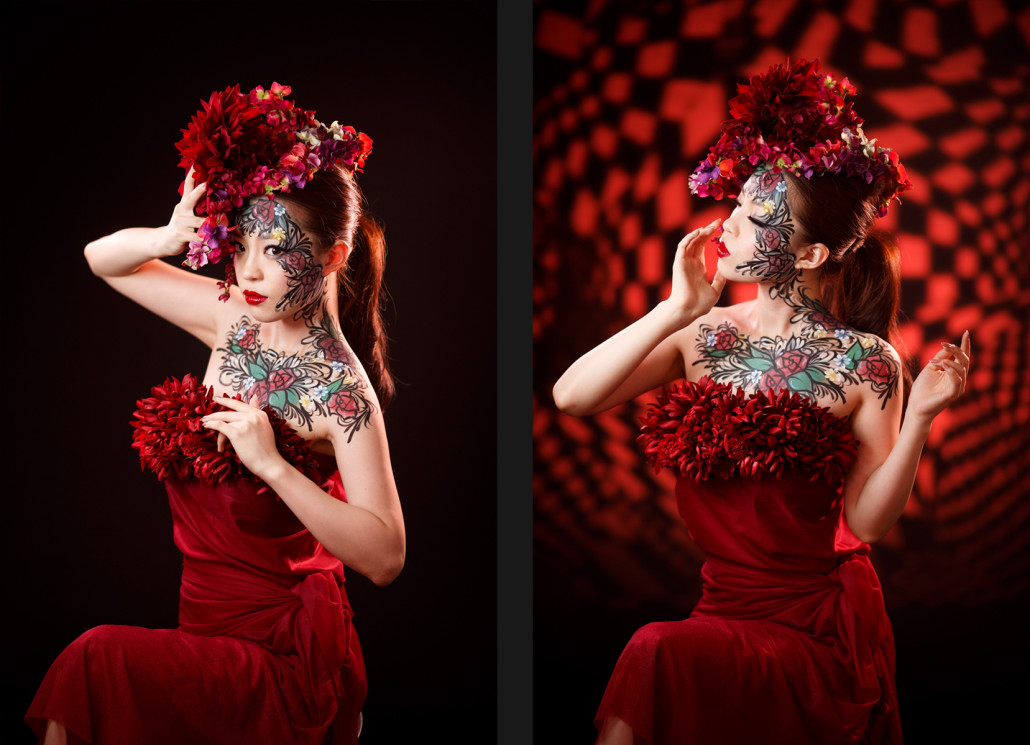
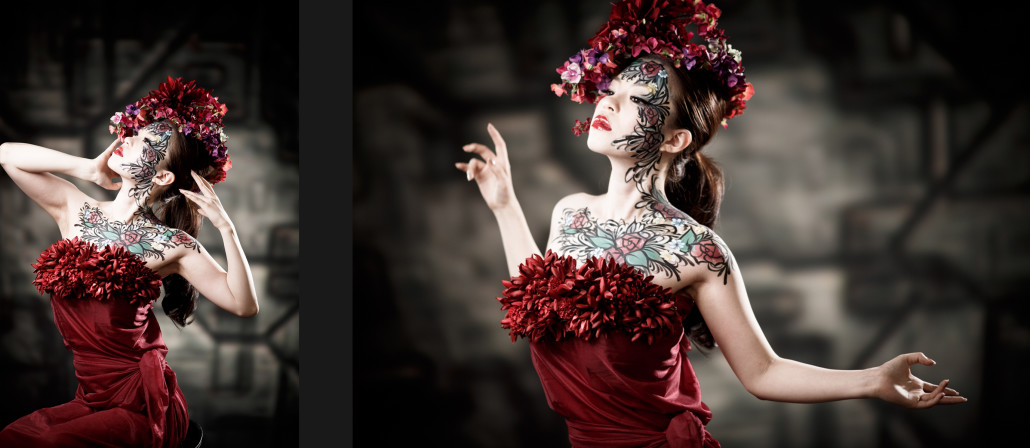
Without and with the Light Blaster ブラスター無しと有りの写真です
Light Blaster
Basically you need a strobe and a lens and it turns into a projector. But unlike a normal projector it is using the strobe power so it is quite powerful! The strobe is tightly fixed on the back side of the Light Blaster, and the lens is mounted on the front side! If you use Canon lenses you can mount them the way they are, and for Nikon lenses you might need some adapter! You don’t really need that quality lens for the projector part, but I would suggest you to use as bright lens as you can! I personally prefer something like aperture f/1.4, which compared to the lens on this image for example (Canon 17-40 F/4) is giving you the advantage of 3 stops of light! So how about the backgrounds? 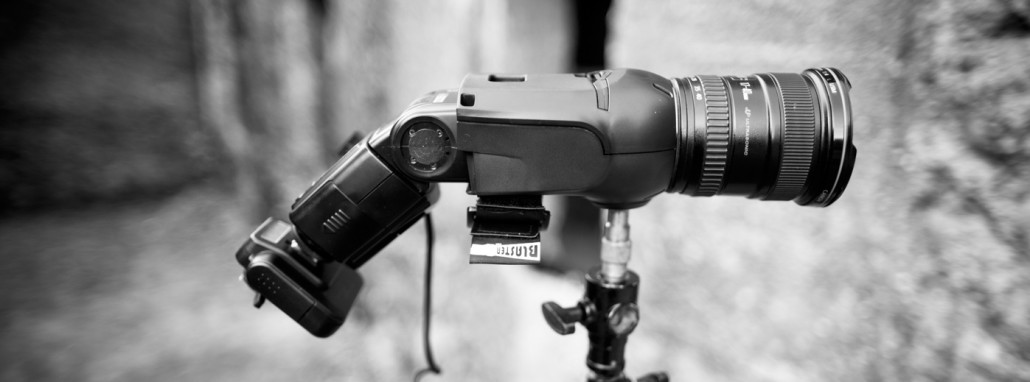 There are a lot of slides that you can purchase together with the Light Blaster, and some of them are really cool! Of course you can get creative and create your own slides! Also you can use the 35mm film slides of you have any! So, the choice of lens Canon 24mm F/1.4 vs. Canon 17-40mm F/4, which one should I put on the camera body, and which one on the Light Blaster? This could be tricky, and you need to think about it carefully! Let me start from the back, to make it easy to understand, I needed ISO-1600 here to expose properly the tunnel with having the Nissin MG8000 strobe at full power 1/1, and the Canon 24 F/1.4 lens set on it! Then on the camera body I had the F/4 lens. Could I do it the other way? Sure, i could set the F/4 lens on the Blaster, and lose 3 stops overall on the background light, and get them back using the F/1.4 lens on the camera body, which would let around 3 stops of available light (if there is any) to influence your photo! Well, it is your choice which one you should do, but generally I would prefer using the brighter lens on the Blaster! So for the strobe at the blaster I do have also a battery pack, and for it was really good to have it since it was at 1/1 power and I wanted it to charge quickly! Well to be honest in most cases when I’m using the blaster from the beginning I set my strobe at Full power and usually I adjust everything else after that! I trigger both flashes with Cactus V6 Trigger as I said already! In a separate article soon I will write more about the blaster with some more of my examples created using it!
ライト・ブラスター
ライト・ブラスターはかなり面白い機材ですよ!それを使えば、あんまり面白くない背景でもプロジェクター使ってるみたいに、自分の好きな背景作れます!この写真もライトブラスターで背景をいじっています!上記の写真にブラスター自体が写っています!ストロボとレンズをつけて、そしてもともとついてるスライドなどを使うと背景を何でも変えれます!手で持ってるのがこの撮影のメインのフォトに使ったスライドです!日本にもライト・ブラスターを取り扱ってるお店がひとつあるので、ぜひご確認ください: OMNIVAS | 機材屋オムニバス ← 名前を押していただいたら、ブラスターのページに飛びますね! ブラスターを使うときはキャノンのレンズが必要になります、ブラスターはキャノンマウントなのです!レンズが明るいほど、光が強くなるので、短焦点レンズがお勧めですね!私の場合24mmの1.4レンズをよくつけます!そして、だいたい使うときはストロボはフル発光のときが多いです!ストロボは1/1パワーに設定してるので、だいたいバッテリーパックも使っています!
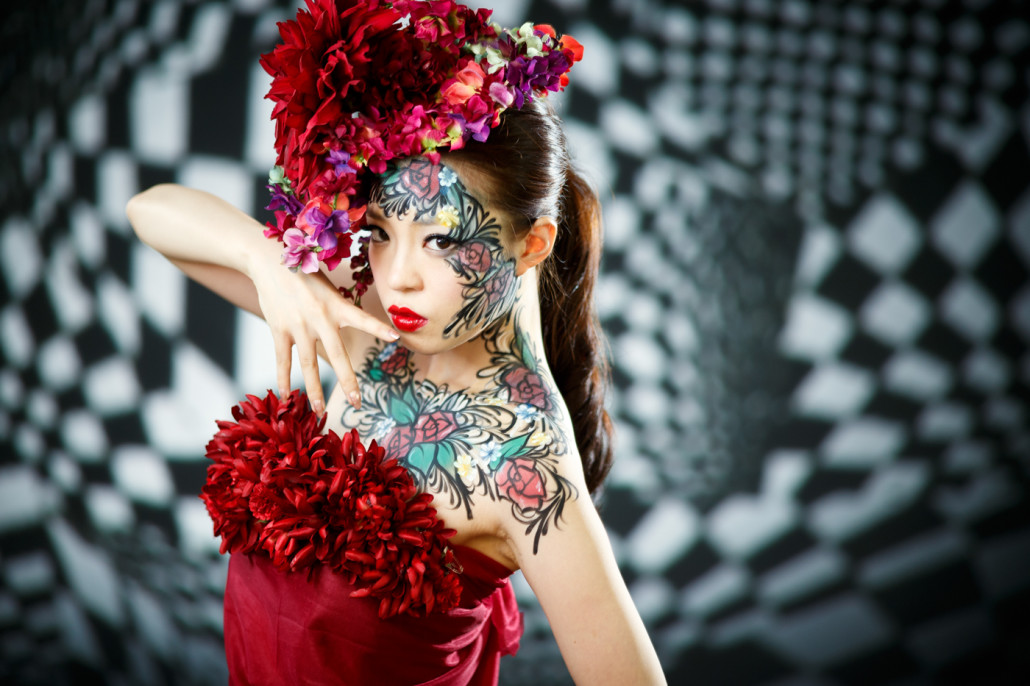
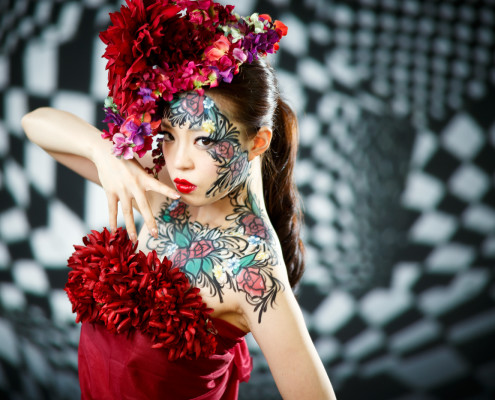
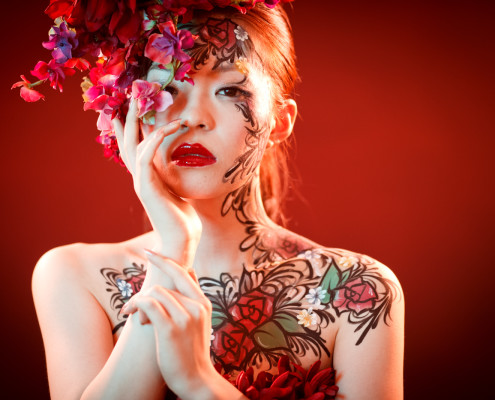
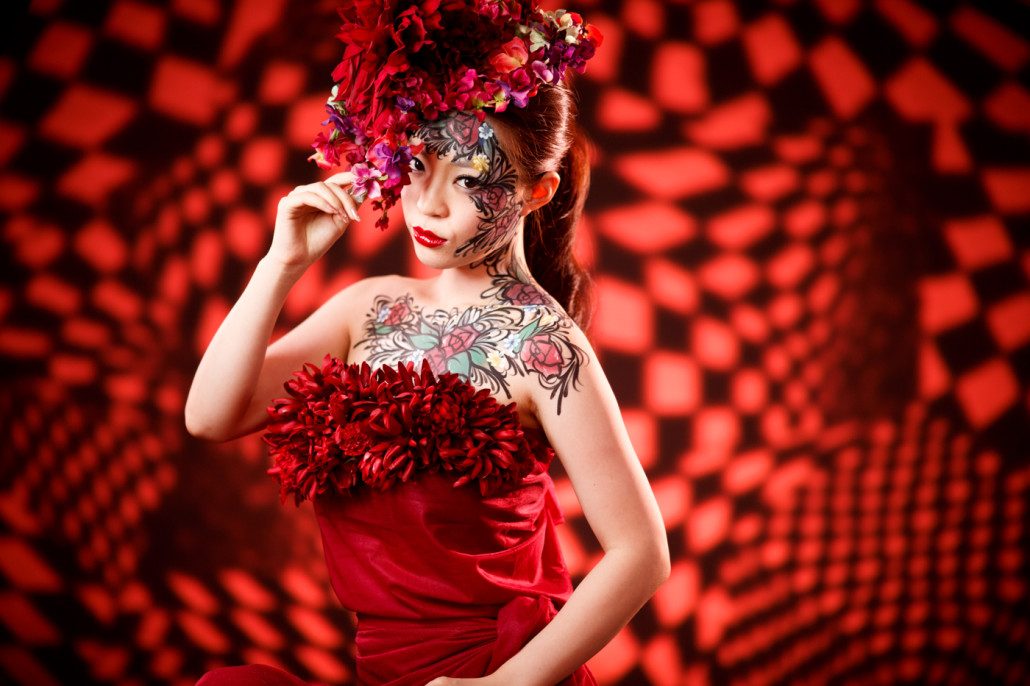
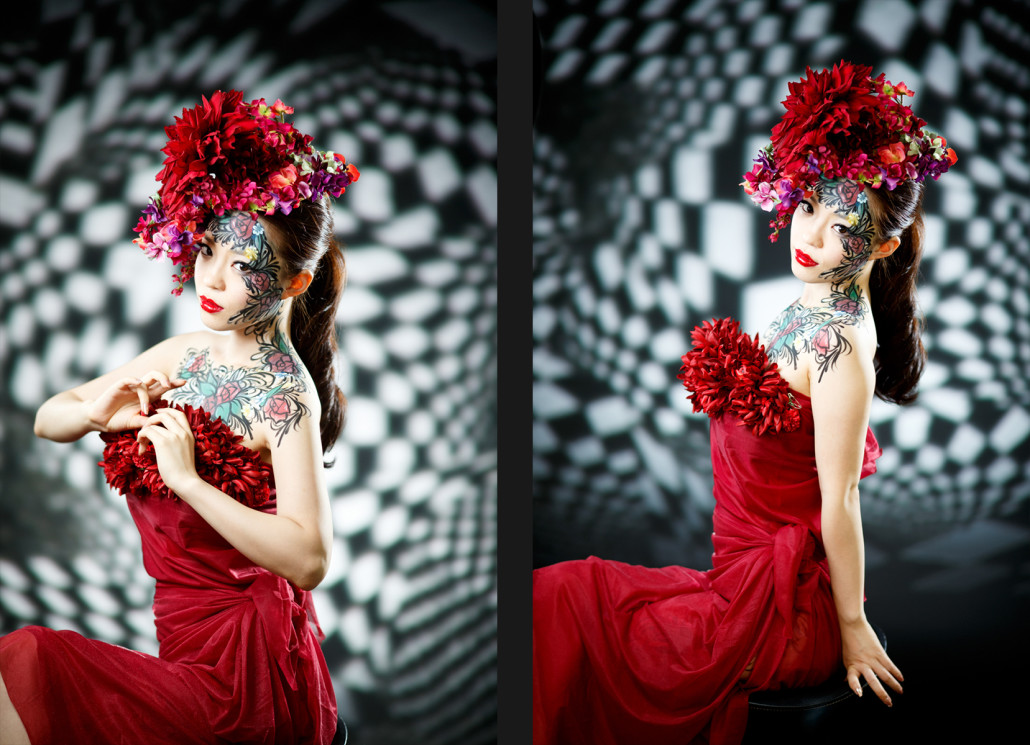
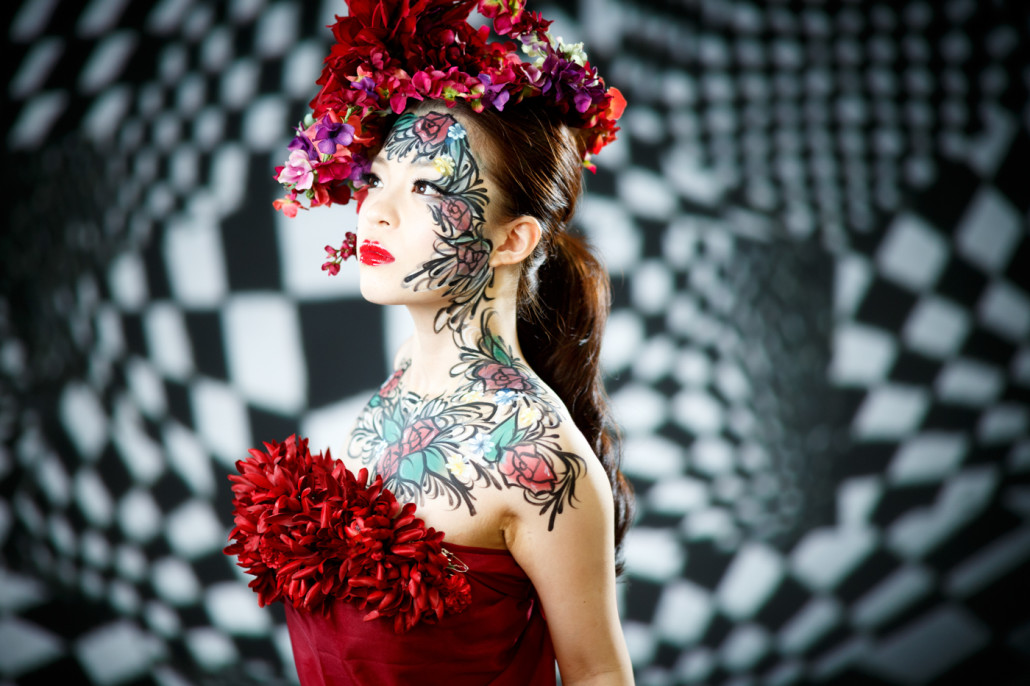
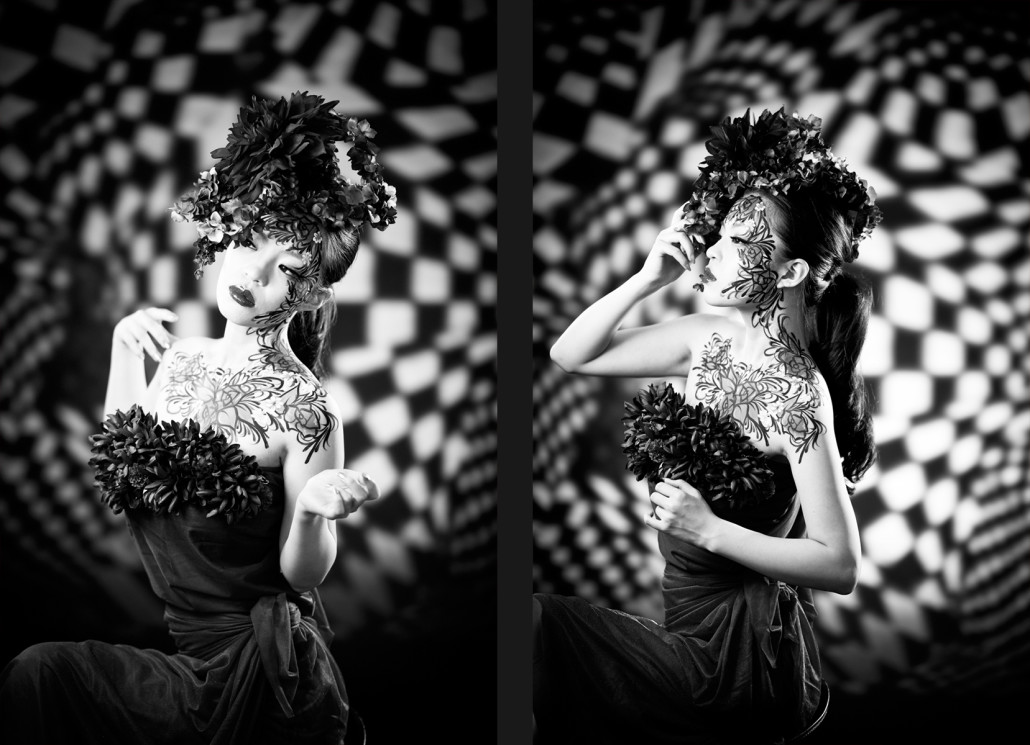
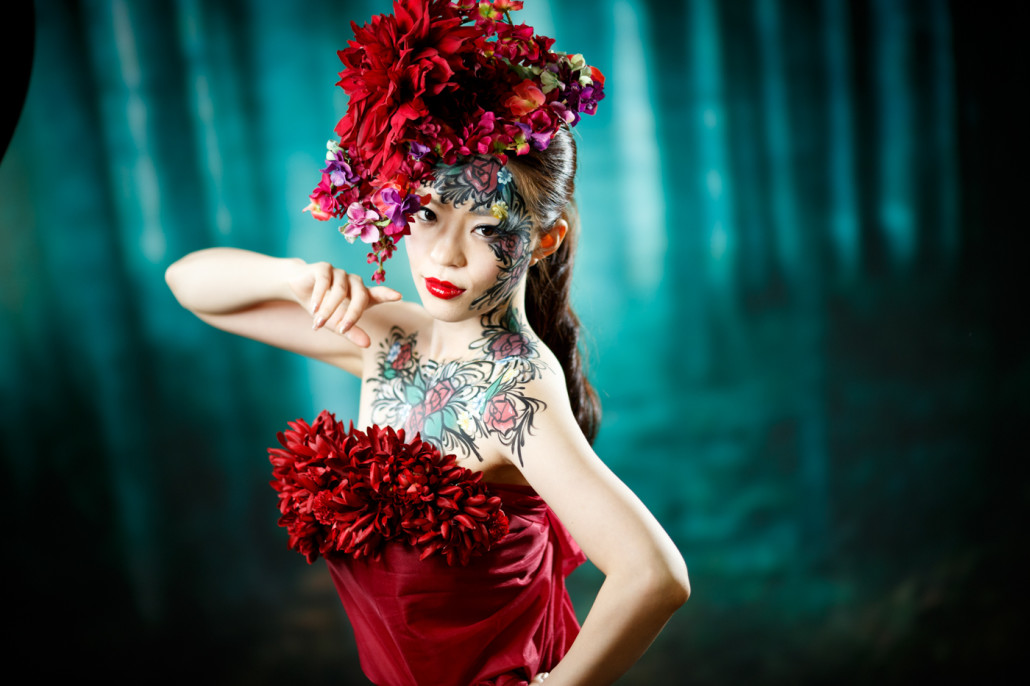
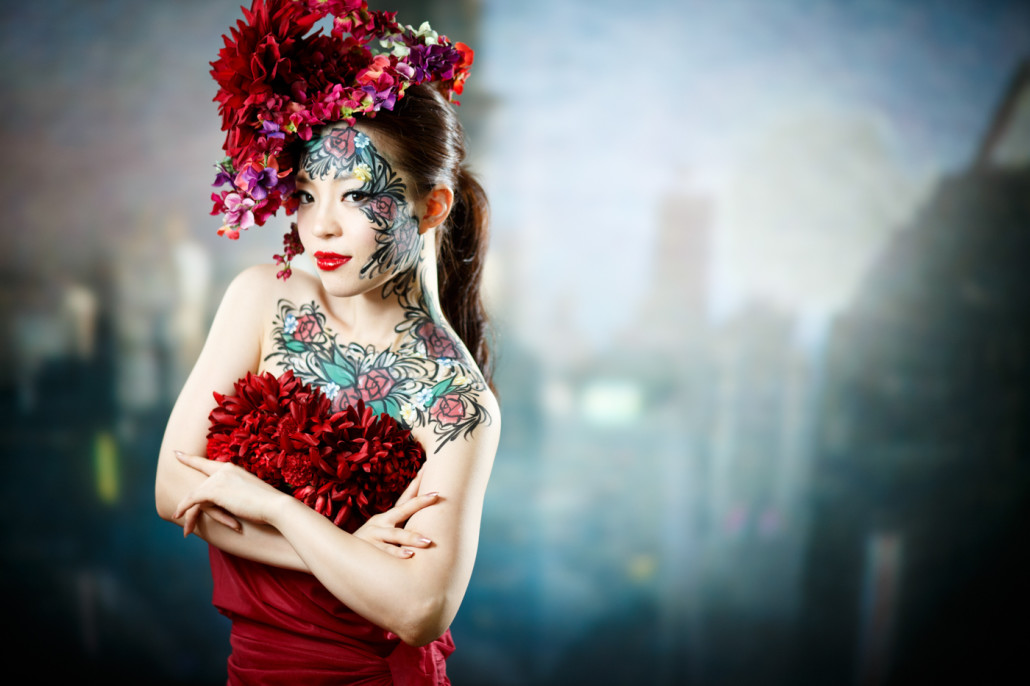
Final Results with different Blaster settings and filters
This was the first time I’m showing you photos with the Light Blaster as a background modifier, and to be honest it really kind of motivated me to shoot more indoors and even in some boring studios! For this shoot I was having my friends For this shot model is Yuzuki Aizawa! Here are a few shots from this photoshoot! And I’m quite excited now to try to make some new interesting backgrounds for my next works! 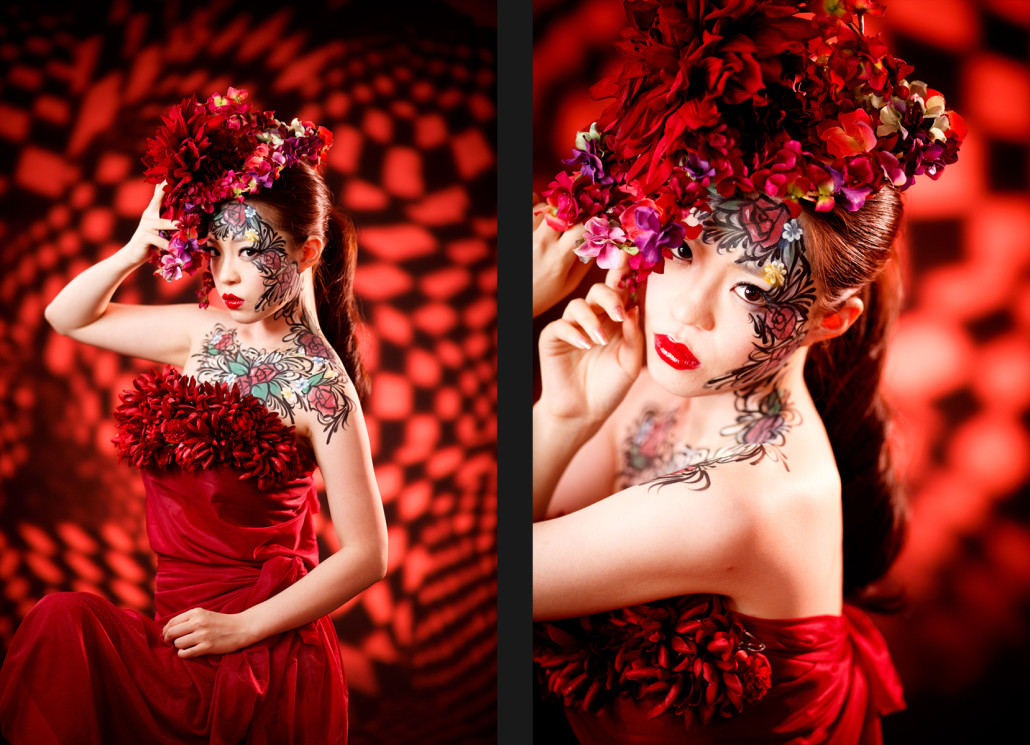

In the end
Now, I am preparing a series of new articles on some general topics, let me know which one of them you want to see first, so I get it ready earlier! Also other ideas are welcome too! Here are some of them: Portraits at night / Lens article (I guess 135/2) / Portraits in the rain / Use of gels / Using backlight / One light setups / Shoots with just one umbrella / General shooting portraits / Can cheap lenses make good photos / Swing the camera shots / Using snoots / Shaped bokeh / … or any other idea welcome, post it in the comments, and I will see if I am able to write about it! Also stay tuned for my new blog section starting soon called “Strobist Diary” There I will talk about many of my off-camera flash techniques from basic things to some advanced stuff!


Leave a Reply
Want to join the discussion?Feel free to contribute!